
Checkout with external products
A checkout with external products is just possible for single products. Therefore you have to specify more information such as tax, description, currency, etc..
If you are using a programming language that is not supported by one of our SDKs and the pre generated checkout string from the Frisbii Media backend sufficient enough you must create the checkout string dynamically. Enrypt Checkout String
Workflow Checkout with external products
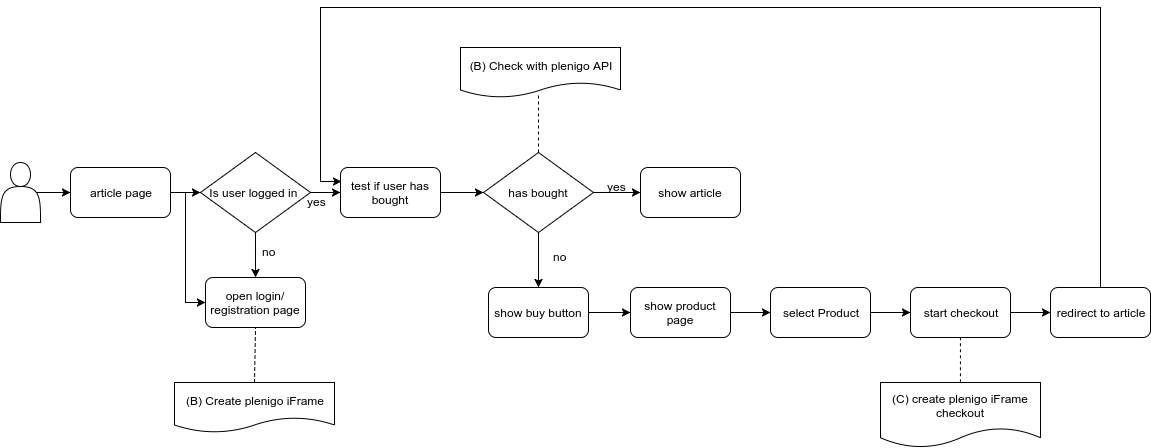
(A) Create Frisbii Media iFrame: If you want to create a registration and login page click the following link -> Create Frisbii Media iFrame
(B) Check with Frisbii Media API: If you want to check if the user has bought the product click the following link -> Has user bought
(C) Create Frisbii Media iFrame checkout: If you want create a Frisbii Media iFrame checkout click the following link -> Encrpyt checkout String , Start Frisbii Media checkout
Checkout including Frisbii Media login
It is not necessary to be logged in to use this snippet, the checkout flow is smart enough to identify when the user is not, and asks him to do so before. Frisbii Media’s checkout flow is done in their own site, and it can easily be started by using the Javascript SDK, there is a quick way of creating a snippet of this call in the SDK.
If the product is not managed by Frisbii Media, you have to specify more information such as tax, description, currency, etc..
For PHP integration you can use the \plenigo\builders\CheckoutSnippetBuilder class, you can create snippets easily by filling out the \plenigo\models\ProductBase class with the required information.
| Parameter | Required | Value type | Description |
|---|---|---|---|
| $id | yes | string | The id of the product |
| $productTitle | yes | string | The product title of the product |
| $price | yes | double | The price of the product |
| $currency | yes | string | The currency of the product |
<?php
require_once 'libs/php_sdk/plenigo/Plenigo.php';

// 1.Step: Configure the PHP SDK: The secret (e.g. secret:QrrDfmzRQcQie3Pp3twzNP8LHsV78TngrY5TTvj) and the company ID (e.g.:23NuCmdPoiRRkQiCqP9Q) in Test Mode(true).
$secret = 'QrrDfmzRQcQie3Pp3twzNP8LHsV78TngrY5TTvj'; // The secret key of your specific company.
$companyId = '23NuCmdPoiRRkQiCqP9Q'; // The company ID of your specific company.
\plenigo\PlenigoManager::configure($secret, $companyId);

// 2.Step: Set the product.
$productId = '12345'; // The product id of the product.
$productTitle = 'test'; // The title of the product.
$price = 15.00;  // The price of the product.
$currency = 'USD'; // The currency.
$product = new ProductBase($productId, $productTitle, $price, $currency);

// 3.Step: Type of the product that defines the taxes.
$product->setType(ProductBase::TYPE_EBOOK);

// 4.Step: Creating the checkout sinppet for this product.The snippet will have the following format: plenigo.checkout('ENCRYPTED_STRING_HERE').
$checkout = new CheckoutSnippetBuilder($product);
$plenigoCheckoutCode = $checkout->build();
Use case
Use case for implementing checkout with external products (Single Products) including Frisbii Media login.
This is a complete example page where you only need to replace the company id (e.g.23NuCmdPoiRRkQiCqP9Q ) and the secret (e.g.QrrDfmzRQcQie3Pp3twzNP8LHsV78TngrY5TTvj). This example assumes you are running in test mode.
Server logic
The first thing you have to do is configuring the PHP SDK.
<?php
require_once __DIR__ . '/plenigo/Plenigo.php';

use plenigo\models\ProductBase;
use plenigo\services\UserService;
use plenigo\builders\CheckoutSnippetBuilder;

// 1.Step: Configure the PHP SDK: The secret (e.g. secret:QrrDfmzRQcQie3Pp3twzNP8LHsV78TngrY5TTvj) and the company ID (e.g.:23NuCmdPoiRRkQiCqP9Q) in Test Mode (true).
\plenigo\PlenigoManager::configure("QrrDfmzRQcQie3Pp3twzNP8LHsV78TngrY5TTvj", "23NuCmdPoiRRkQiCqP9Q", true);

// 2.Step: Set the product.
// Creating the product ($productId, $productTitle, $price, $currency).
$product = new ProductBase('123456', 'the best product',15.00,'USD');

//  3.Step: Type of the product that defines the taxes.
$product->setType(ProductBase::TYPE_EBOOK);

// 4.Step: This method returns true if the user has already bought the product.
$hasUserBought = UserService::hasUserBought($product->getId());
if ($hasUserBought === FALSE) {

//  5.Step: Creating the checkout snippet for this product.The snippet will have the following format: plenigo.checkout('ENCRYPTED_STRING_HERE').
$checkout = new CheckoutSnippetBuilder($product);
$plenigoCheckoutCode = $checkout->build();
}
?>
Page logic
<!DOCTYPE html>
<html>
<head>
    <title> The title of the article </title>
    <!--
        Let's use concrete values:
        company ID = e.g. "23NuCmdPoiRRkQiCqP9Q"
    -->
    <script type="application/javascript"
            src="https://static.plenigo.com/static_resources/javascript/23NuCmdPoiRRkQiCqP9Q/plenigo_sdk.min.js"
            data-lang="en">
    </script>
</head>
<body>
<?php if (!$hasUserBought) { ?>
    <p> The description of the article </p>
    <button onclick="<?php echo $snippet ?>"> Buy now</button>
<?php } else { ?>
    <p> Thank you for your order </p>
<?php } ?>
</body>
</html>
Checkout with external login
If you want to do a checkout without the login functionality of Frisbii Media you have to do the following steps. First of all you have to register the external user into the Frisbii Media system. After you have done this you have to create a Login Token for this user.
Use case
Use case for implementing checkout with external products(Single Products) with external login.This example assumes you are running in test mode.
Server logic
The first thing you have to do is configuring the PHP SDK.
<?php
require_once __DIR__ . '/plenigo/Plenigo.php';

use plenigo\builders\CheckoutSnippetBuilder;
use plenigo\models\ProductBase;
use plenigo\services\UserService;
use plenigo\services\UserManagementService;

// 1.Step: Configure the PHP SDK:  Provide the secret (e.g. secret:Q11DfmzRQcQie3Pp3twzKO32HsV78TngrY2ddvj) and the company ID (e.g.:23NuCmdPoiRRkQiCqP9Q) in Test Mode (true).
\plenigo\PlenigoManager::configure("Q11DfmzRQcQie3Pp3twzKO32HsV78TngrY2ddvj", "23NuCmdPoiRRkQiCqP9Q", true);

// 2.Step: Set product details and the type of the product.
$product = new ProductBase('ProductID', 'ProductDescription', PriceOfTheProduct, 'TheCurrency');
$product->setType(ProductBase::TYPE_EBOOK);

// 3.Step: Register the user into the Frisbii Media system.
$userId = UserManagementService::registerUser("user@testmail.com", "language", "theCustomerId", 'firstName', 'name');

// 4.Step: Create the login token for this user.
$loginToken = UserManagementService::createLoginToken($userId);

// 5.Step: Check if the user has bought the product.
$hasUserBought = UserService::hasUserBought($product1->getId());
if ($hasUserBought === FALSE) {
// Since he has not bought the product, we need to build the
// checkout snippet so that he can do the flow on the Frisbii Media
// site and buy.
$checkout = new CheckoutSnippetBuilder($product);
$settings = array();
$plenigoCheckoutCode = $checkout->build($settings, $loginToken);
}
?>
Page logic
In the Page you have to replace the company ID in the Javascript declaration, e.g. if you have the following link: “https://static.plenigo.com/static_resources/javascript/COMPANY_ID/plenigo_sdk.min.js”
You will replace COMPANY_ID for the corresponding ID of your company(e.g. 23NuCmdPoiRRkQiCqP9Q), after replacing it should look like this: “https://static.plenigo.com/static_resources/javascript/23NuCmdPoiRRkQiCqP9Q/plenigo_sdk.min.js”
By clicking on the “Buy now” button the Checkout flow will start.
Checkout flow from Frisbii Media:
-
User clicks on “Buy now” button. User has to login into the Frisbii Media system. Checkout With Remote Login)
-
After the login was successful a payment screen will appear. There the user has to choose a payment method for the product.
-
After the payment was successful the user will be redirect to the article page.
<!DOCTYPE html>
<html>
<head>
    <title> The title of the article </title>
    <!--
        Let's use concrete values:
        company ID = e.g. "23NuCmdPoiRRkQiCqP9Q"
    -->
    <script type="application/javascript"
            src="https://static.plenigo.com/static_resources/javascript/23NuCmdPoiRRkQiCqP9Q/plenigo_sdk.min.js"
            data-lang="en">
    </script>
</head>
<body>
<?php if (!$hasUserBought) { ?>
    <p> The description of the article </p>
    <button onclick="<?php echo $snippet ?>"> Buy now</button>
<?php } else { ?>
    <p> Thank you for order </p>
<?php } ?>
</body>
</html>
Checkout without SDK
If you are using a programming language that is not supported by one of our SDKs and the pre generated checkout string from the Frisbii Media Backend sufficient enough you must create the checkout string dynamically. Enrypt Checkout String
Failed Payments
If you want to create a button/link to the “Failed Payments” listing for the customer you can do it by creating a special product object like this.
For PHP integration you can use the \plenigo\builders\CheckoutSnippetBuilder class, you can create snippets easily by filling out the \plenigo\models\ProductBase class with the required information.
<?php
require_once 'libs/php_sdk/plenigo/Plenigo.php';
// 1.Step: Configure the PHP SDK.
$secret = 'RrrDfmzUTcQiY8PpLtwzNP8LHsV78TngrY5TTvj'; // The secret key of your specific company.
$companyId = '23NuCmdPoiRRkQiCqP9Q'; // The company ID of your specific company.
\plenigo\PlenigoManager::configure($secret, $companyId);

// 2.Step: Creating special product object for "Failed Payments".
$product = ProductBase::buildFailedPaymentProduct();

// 3.Step: Creating the checkout snippet.
$checkout = new CheckoutSnippetBuilder($product);
$plenigoCheckoutCode = $checkout->build();

// 4.Step: Now we can use this snippet in a link or button.
echo '<a href="#" onclick="'.$plenigoCheckoutCode.'return false;">Buy now</a>';