
Start integration
If you are not able to use one of the existing SDKs you can also implement the functionality of the Frisbii Media API by yourself.
There are some additional things you have to implement besides the API to use the full feature set of Frisbii Media.
Frisbii Media relies heavily on correct date times so make sure your servers time is up to date. Running NTP is strongly recommended.
Frisbii Media Token
Every request to the Frisbii Media API is protected by a so called “Frisbii Media Token”. The Frisbii Media token is a JWT with Hash Algorithm HS256. Use your Frisbii Media merchant secret key as key for the hash function.
The JWT itself contains the following payload
| Parameter | Description |
|---|---|
| jti | Unique identifier for this request. This identifier is there to prevent reply attacks so you must not reuse it |
| aud | Must be the string “plenigo” |
| exp | Validity time for the JWT. We recommend the current timestamp plus 5 minutes |
| companyId | Your company id from the Frisbii Media merchant backend |
Test
C#
class Plenigo
{
    public static string CreatePlenigoToken()
    {
        var unixEpoch = new DateTime(1970, 1, 1, 0, 0, 0, DateTimeKind.Utc);
        var now = Math.Round((DateTime.UtcNow - unixEpoch).TotalSeconds);
        var payload = new Dictionary<string, object>()
        {
            { "jti", System.Guid.NewGuid().ToString()},
            { "aud", "plenigo"},
            { "exp",    Math.Floor((now + 5 * 60 * 1000) / 1000)},
            { "companyId", "COMPANY_ID"}
        };

        var secretKey = "secret";
        string token = JsonWebToken.Encode(payload, secretKey, JWT.JwtHashAlgorithm.HS256);
        return token;
    }
}

WebClient client = new WebClient();
client.Headers.Add("plenigoToken", Plenigo.CreatePlenigoToken());

// call API function
GO
import(
   jwt "github.com/dgrijalva/jwt-go"
   "github.com/satori/go.uuid"
   "time"
)

func generateToken(companyId string, companySecret string) string {
   token := jwt.NewWithClaims(jwt.SigningMethodHS256, jwt.MapClaims{
      "companyId": companyId,
      "exp":       time.Now().Add(time.Minute * time.Duration(5)).Unix(),
      "aud":       "plenigo",
      "jti":       uuid.NewV4(),
   })

   // Sign and get the complete encoded token as a string using the company secret
   tokenString, err := token.SignedString([]byte(companySecret))

   if err != nil {
      // handle error
   }
}
Metered views
MV
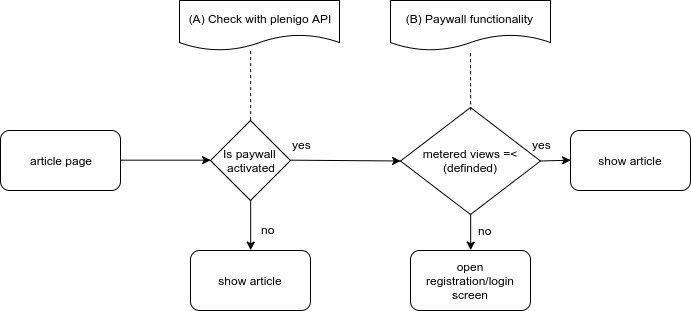
Frisbii Media makes it simple to add a paywall to your system. First of all you have to enable the paywall. Therefore you have to login in the merchant backend with your credentials. Navigate to “Paywall” -> “Settings”. Here you must activate the paywall. Furthermore you can disable and enable the paywall with the timing.
Workflow metered views
With SDKs
Without Frisbii Media SDKs
(A) Check with Frisbii Media API -> Paywall state
(B)
Implementation with SDKs
Java
For Java you can use the com.plenigo.sdk.services.MeterService#hasFreeViews method for this purpose:
boolean hasFreeViews = MeterService.hasFreeViews(cookieHeader, requestQueryString);
if (hasFreeViews) {
        showArticle();
}
else {
        showPaywall();
     }
PHP
For PHP you can use the plenigo\services\MeterService::hasFreeViews method for this purpose:
$freeViews = \plenigo\services\MeterService::hasFreeViews();
if ($freeViews) {
        showArticle();
}
else {
        showPaywall();
     }
Implementation without SDKs
Cookie decryption
The metered view cookie is encrypted to prevent easy manipulation. The encryption will not prevent manipulation completely but needs a deeper technical understanding. The cookie itself is called plenigo_view
Base information:
- The decrypted data is formatted the following way {value}|{value}|{value}…
- The encryption method used is AES/CTR/NoPadding 128 bit with the following initialization vector: 7a134cc376d05cf6bc116e1e53c8801e. The encrypted byte string is converted to a hexadecimal string.
- Key for encryption is a MD5 hash of the company id (not the company secret!) that can be retrieved from the company administration area.
Decrypting the cookie works as in the pseudo code below:
decrypt("AES", "AES/CTR/NoPadding", Hex.decode(COMPANY_ID_MD5_VALUE), Hex.decode(COOKIE_DATA), Hex.decode(IV_STRING));
| Parameters | Description |
|---|---|
| COMPANY_ID_MD5_VALUE | The MD5 checksum of your company id. |
| COOKIE_DATA | Complete cookie data string. |
| IV_STRING | Always 7a134cc376d05cf6bc116e1e53c8801e |
Cookie content
After decryption the following string will be presented:
browserId|activated|freeViews|viewsTaken|limitReached|countOnlyUniqueViews|ignoreSearchEngines|ignoreSocialMedia|articlesVisited|freeViewsAfterLogin|viewsTakenAfterLogin|limitReachedAfterLogin|startTime|meteredPeriod|startWithFirstDay|cookieCreationTime
The values mentioned above will contain the following information
| Value | Description |
|---|---|
| browserId | unique browser fingerprint |
| activated | flag indicating if metered view is activated at all |
| freeViews | number of free views allowed |
| viewsTaken | number of free views already taken |
| limitReached | flag indicating if free view limit is reached |
| countOnlyUniqueViews | flag indicating to count only unique views |
| ignoreSearchEngines | flag indicating to ignore search engines |
| ignoreSocialMedia | flag indicating to ignore social media |
| articlesVisited | comma separated list containing the already visited articles (in case of the http-addresses these are the first 8 characters of the MD5 sum of the http-address) |
| freeViewsAfterLogin | free views available after login |
| viewsTakenAfterLogin | free views taken after login |
| limitReachedAfterLogin | flag indicating if limit of free views after login is reached |
| startTime | time of the first page hit |
| meteredPeriod | time period metered view counter is running. Possible values (DAY, WEEK, MONTH, YEAR) |
| startWithFirstDay | flag indicating if metered period starts with first visit or at first day / 0 o’clock, etc. |
| cookieCreationTime | time as long indicating representing cookie creating time |
The idea behind metered view functionality is demonstrated with the following pseudo code example
meteredViewInfo = extractMeteredViewCookie();
if (productIsBought)
   showProduct();
else if (meteredViewInfo.isMeteredViewAllowed)
   showProduct();
If there is no plenigo_view cookie available the SDKs should handle it the same way as if metered view is allowed by the user and the counter should start at 0. The Javascript SDK will correct this decision if it is incorrect.
The following checks must be done by the SDKs if there is a cookie set
checkCookieValidity = function() {
    if (meteredPeriod == 'DAY' && cookieCreationTimeIsTheDayBefore())
        return false;
    else if (meteredPeriod == 'WEEK' && cookieCreationTimeIsTheWeekBefore())
        return false;
    else if (meteredPeriod == 'MONTH' && cookieCreationTimeIsTheMonthBefore())
        return false;
    else if (meteredPeriod == 'YEAR' && cookieCreationTimeIsTheYearBefore())
        return false;
    else
        return true;
}

if (limitReached && userNotLoggedIn() && checkCookieValidity())
   blockAccess();
else if (limitReachedAfterLogin && userLoggedIn() && checkCookieValidity())
   blockAcccess();
External User Management
It is possible to use your own registration and login process and only login users into Frisbii Media via so called “Login Tokens”.
Register an external user
General Workflow external user management
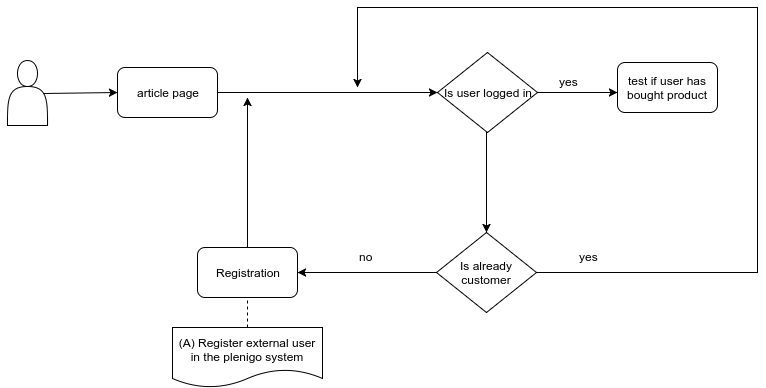
(A) Register external user in the Frisbii Media system: -> Register External User
Implementation with SDKs
PHP
<?php
/**
 * Registers a new user bound to the company that registers the user.
 *
 * @param string $email Email address of the user to register
 * @param string $language Language of the user as two digit ISO code
 * @param int $externalUserId An integer number that represents the user in the external system
 * @param string $firstName A given name for the new user
 * @param string $name A las name for the new user
 *
 * @return string Id of the created customer.
 *
 * @throws PlenigoException In case of communication errors or invalid parameters.
 */
\plenigo\services\UserManagementService::registerUser($email, $language = "en", $externalUserId = null, $firstName = null, $name = null)
Implementation without SDKs
Another possibility to register an external user into the Frisbii Media system - can be a direct call to our REST API:
Change email address of an existing user
It is very important for the Frisbii Media system to know the correct email address of the user. Otherwise invoices, etc. cannot sent to the user. If the user or one of your support agents changes the email of the user in your user management system you have to inform the Frisbii Media system about the changes.
Implementation with SDKs
Java
For Java you can use the com.plenigo.sdk.services.UserManagementService#changeEmail method for this purpose:
UserManagementService SDK useExternalCustomerID feld fehlt
PHP
<?php
//Replaye MY_CUSTOMER, MY_EMAIL, MY_USE_EXTERNAL_CUSTOMER_ID with the real data
\plenigo\services\UserManagementService::changeEmail($MY_CUSTOMER, $MY_EMAIL, $MY_USE_EXTERNAL_CUSTOMER_ID = false)
Implementation without SDKs
Another possibility to change an email address of an existing user - can be a direct call to our REST API:
Create login token for an external user
Implementation with SDKs
PHP
To indicate a successful login to the Frisbii Media system you need to create a so called “Login Token”. This login token is valid for 5 minutes and can be passed e.g. to the bulid()- method of the \plenigo\builders\CheckoutSnippetBuilder`.
Implementation without SDKs
Another possibility to get category information - can be a direct call to our REST API:
Giving a customer more access ids
With this functionality the company can provide several access ids to a given customer. This is useful if the company has internal systems for billing, CRM, customer engagement, etc. With this data entered, you can use any of these Ids to check for access to products below.
Implementation with SDKs
Java sdk fehlt
PHP
The secret (e.g. “RYsDfmNzTWcQiO8PpLtwzNP8LHsV154TngrY5SSvj”) and the company-ID (e.g. “51NuCmdDRTZZDkQqCqP2Q”) of the Frisbii Media merchant backend.
<?php
require_once 'libs/php_sdk/plenigo/Plenigo.php';

// 1.Step Configure the Frisbii Media Manager:
$secret = 'SECRET';
$companyId = 'COMPANY_ID';

//configure Frisbii Media:
\plenigo\PlenigoManager::configure($secret, $companyId);

// 2. Get the customer id
$isExternal = false; // False=Plenigo Customer ID / True=External customer ID
$customerIds = array('<MY_SAP_CUSTID>', '<MY_CRM_CUSTID>', '<MY_BILLING_CUSTID>', '<MY_ECOMMERCE_CUSTID>'); // one up to four access id

// (surround this code with a try/catch block to handle errors)
UserManagementService::importCustomerAccess($customerId, $isExternal, $customerIds);

// At this point if no Exceptions were thrown, then the customer access has been imported
Has my user bought products
To check if a customer has bought a product follow these steps:
PHP
<?php
// 1.Step Configure the Frisbii Media Manager:
$secret = 'SECRET';
$companyId = 'COMPANY_ID';

\plenigo\PlenigoManager::configure($secret, $companyId);

//2. Get the customer id
//3. Get the product id
$hasBeenPaid = UserService::hasUserBought($productId, $customerId);
// $hasBeenPaid will be TRUE if the product has been bought by the customer, FALSE otherwise
Single sign on (SSO)
Single sign-on (SSO) is a session and user authentication service that permits a user to use one set of login credentials (e.g., name and password) to access multiple applications. The service authenticates the end user for all the applications the user has been given rights to and eliminates further prompts when the user switches applications during the same session. On the back end, SSO is helpful for logging user activities as well as monitoring user accounts.
There are two different ways to implement SSO with Frisbii Media:
- OAuth2 (recommended)
- Cookie based
OAuth2
Definition OAuth 2.0
OAuth is an open standard for authorization. OAuth provides client applications a ‘secure delegated access’ to server resources on behalf of a resource owner. It specifies a process for resource owners to authorize third-party access to their server resources without sharing their credentials. Designed specifically to work with Hypertext Transfer Protocol (HTTP), OAuth essentially allows access tokens to be issued to third-party clients by an authorization server, with the approval of the resource owner, or end-user. The client then uses the access token to access the protected resources hosted by the resource server.
What OAuth 2.0 does for you and what not
- OAuth 2.0 enables your users to use existing accounts for signing in to your application/website
- OAuth 2.0 allows you to access resources from other services in a defined way, e.g. retrieve user profile data without the need to request them from the user
- OAuth 2.0 doesn’t replace your own user management
General OAuth 2.0 Workflow
    1.Authorization Request: A Client Application must first obtain authorization from the Resource Owner before it can access a protected resource.
    2.Grant Request: The Client Application then exchanges the access grant for an access token.
    3.Access Token: Lastly, the Client Application accesses the protected resource by presenting the access token to the resource server.
+--------+                               +---------------+
|        |--(1)- Authorization Request ->|   Resource    |
|        |                               |     Owner     |
|        |<-(1.1)-- Authorization Grant ---|               |
|        |                               +---------------+
|        |
|        |                               +---------------+
|        |--(2)-- Authorization Grant -->| Authorization |
| Client |                               |     Server    |
|        |<-(2.1)----- Access Token -------|               |
|        |                               +---------------+
|        |
|        |                               +---------------+
|        |--(3)----- Access Token ------>|    Resource   |
|        |                               |     Server    |
|        |<-(3.1)--- Protected Resource ---|               |
+--------+                               +---------------+
Example usage for OAuth 2.0 with Frisbii Media
In the following example we assume that a Frisbii Media client called “Merchant” is using the Frisbii Media OAuth 2.0 interfaces. To concentrate on the actual logic, there will be no concrete programming languages included. Please consult the SDK documentations for that case.
We are starting with the following scenario:
- UserA is registered at Frisbii Media
- UserA is not known by Merchant
- UserB is registered at Frisbii Media
- UserB was logged in via OAuth 2.0 and Frisbii Media by Merchant before
Let’s start with UserA
- UserA visits the homepage of Merchant and click login
- Merchant calls the Frisbii Media login screen snippet
- UserA enters his user data at Frisbii Media and logs in
- UserA gets redirected to the Merchant’s homepage together with a so called access code
- Merchant’s server takes this access code and requests an access token and a refresh token from Frisbii Media. Both codes are saved within the users session. (After requesting an access token for the first time UserA will never be prompted again to authorize Merchant)
A access token has only a limited lifetime, after that the Frisbii Media server will response with a timeout message. Then the Merchant server has to request a new access token with the refresh token. If Merchant wants to access the Frisbii Media API over a longer time period, e.g. 20 days without requesting a new login process for the user, it can save the refresh token to create new access tokens at anytime.
- With the access token Merchant requests the user profile of the user from the Frisbii Media API
- Merchant now compares the customerId of Frisbii Media with the ones he has within his user database and will not find it, because UserA was never there before. So Merchant creates a new customer profile for UserA with the data delivered by Frisbii Media.
- Merchant can now use this customer as if it was his own customer only future logins must done via Frisbii Media
Now let’s see what is going on with UserB
- UserB visits the homepage of Merchant and click login
- Merchant calls the Frisbii Media login screen snippet
- UserB enters his user data at Frisbii Media and logs in
- UserB gets redirected to the Merchant’s homepage together with a so called access code
- Merchant’s server takes this access code and requests an access token and a refresh token from Frisbii Media. Both codes are saved within the users session. (After requesting an access token for the first time UserA will never be prompted again to authorize Merchant)
Any old refresh tokens will be invalid from this point on.
- With the access token Merchant requests the user profile of the user from the Frisbii Media API
- Merchant now compares the customerId of Frisbii Media with the ones it has within its user database and will find it, because UserB was there before. So the login is finished now. (Of course you could check if user data has changed and update them if necessary)
Using OAuth 2.0 to use Frisbii Media as SSO
Frisbii Media APIs use the OAuth 2.0 protocol for authentication and authorization. Frisbii Media supports common OAuth 2.0 scenarios such as those for web server, installed, and client-side applications.
OAuth 2.0 is a relatively simple protocol. To begin, a customer must obtain OAuth 2.0 credentials from the company dashboard. Then the different log in features the Javascript SDK offers can be used in combination with the server side SDKs.
All responses are JSON formatted.
Authenticating the user
There are two possible ways to start the user authentication
- During a checkout process by providing the SSO flag
- Implementing a javascript snippet that starts a login process at Frisbii Media
Start user authentication
Login Process
Customers should protect the security of their end users by preventing request forgery attacks. The first step is creating a unique session token that holds state between the customers server and the end user’s client. This unique session token is later matched with the authentication response returned by the Frisbii Media OAuth Login service to verify that the user is making the request and not a malicious attacker. These tokens are often referred to as cross-site request forgery (CSRF) tokens.
One good choice for a state token is a string of 30 or so characters constructed using a high-quality random-number generator. Another one is a hash generated by signing some of the session state variables with a key that is kept secret on the back-end.
Java example
// Create a state token to prevent request forgery and store it in the session for later validation.
String state = new BigInteger(130, new SecureRandom()).toString(32);
request.session().attribute("state", state);
PHP example
<?php
// Create a state token to prevent request forgery and store it in the session for later validation.
$state = md5(rand());
$app['session']->set('state', $state);
Python example
# Create a state token to prevent request forgery and store it in the session for later validation.
state = ''.join(random.choice(string.ascii_uppercase + string.digits) for x in xrange(32))
session['state'] = state
Frisbii Media Login
After the optional CSRF token creation, the SDKs should offer the functionality to create the following Javascript snippet
plenigo.login("REDIRECT_URI", "SCOPE", "STATE");
The three parameters to use can partially be filled automatically and some has to be offered by the customer.
|Name|Value| |:—|:—-| |REDIRECT_URI|The URL to be redirected to after successful login to finish up the server side workflow. The given URL (or at least the starting part) must be registered in the Frisbii Media backend. Otherwise an error is returned.| |SCOPE|Currently the only supported scope is profile. But more will come so this should be set by the customer.| |STATE|The state is the CSRF. During the management of the CSRF by the SDK this should be provided by the SDK.| Javascript Example
     var config = {
         ssoRedirectURL: 'http://redirectUrl.com',
         scope: 'profile'
     };
     plenigo.login(config);
Python Example
Go Example
Examples for php and java are in the following links:
After the user finished the login process and accepts the company to be authorized to access his data, he will be redirected to the given target URL.
In case of an error the given redirect URL is called with the following parameters.
https://example.com/given_path?error=ERROR_NAME&error_description=ERROR_DESCRIPTION
The possible values for error can be found in the OAuth 2.0 protocol specification.
Get access token
After the login process or checkout process including login finished the redirect URL will be called and look the following way.
https://example.com/given_path?state=&security_token=138r5719ru3e1&code=AdE123412EdVD
The parameters are
| Name | Value | Mandatory |
|---|---|---|
| state | The CSRF token created | No |
| code | Access code to request a access token with | Yes |
The first step depends if a CSRF token was provided or not. If yes the CSRF request token should be checked first.
Java example
// Ensure that there is no request forgery going on, and that the user sending us this connect request is the user that was supposed to.
if (!request.queryParams("state").equals(savedState)) {
    // show error to the user (HttpStatus code 401)
}
PHP example
<?php
// Ensure that there is no request forgery going on, and that the user sending us this connect request is the user that was supposed to.
if ($request->get('state') != ($app['session']->get('state'))) {
    // show error to the user (HttpStatus code 401)
}
Python example
# Ensure that the request is not a forgery and that the user sending this connect request is the expected user.
if request.args.get('state', '') != session['state']:
  # show error to the user (HttpStatus code 401)
Now the access token has to be obtained in exchange for the access code received after the login. To do so the a server side request to the Frisbii Media server must be executed and call the following URL. The request is an HTTP POST request.
https://api.plenigo.com/api/v2/oauth2/verify
The body has to contain the following parameters
| Name | Value | Mandatory |
|---|---|---|
| grant_type | The only allowed value is authorization_code. | Yes |
| code | The authorization code returned in the code parameter after the login. | Yes |
| redirect_uri | A valid return URL defined in the Frisbii Media company backend. | Yes |
| client_id | The company id offered by Frisbii Media. | Yes |
| client_secret | The company secret also used for encryption, etc. | Yes |
| state | There can be added an optional identifier like in the request above and it will be returned in the result. | No |
The response will contain the following body in case of success
| Name | Value | Mandatory |
|---|---|---|
| access_token | Access token to be used for future request to services. | Yes |
| token_type | Token type is always bearer. | Yes |
| expires_in | Expire time for the access token after that time a new access_token must be received with the help of the refresh token. | Yes |
| refresh_token | Refresh token to request a new access token if access token is lost or timed out. | Yes |
| state | Optional identifier if it was send during request. | No |
In case of an error the the following parameters are returned.
| Name | Value |
|---|---|
| error | error code |
| error_description | error description |
The possible values for error can be found in the OAuth 2.0 protocol specification.
Refresh access token
With the help of the refresh token received during the request of an access token a new access token can be requested if the current access token times out.
If the refresh token is no longer available the login process has to be restarted from the Javascript part.
To get a new access token the SDK has to make a server side request to the Frisbii Media server and call the following URL. The request is a HTTP POST request.
https://api.plenigo.com/api/v2/oauth2/renew
The body has to contain the following parameters
| Name | Value | Mandatory |
|---|---|---|
| grant_type | The only allowed value is refresh_token. | Yes |
| refresh_token | he refresh token received during the authorization token request. | Yes |
| client_id | The company id offered by Frisbii Media. | Yes |
| client_secret | The company secret also used for encryption, etc. | Yes |
| state | There can be added an optional identifier like in the request above and it will be returned in the result. | No |
The response will contain the following body in case of success
| Name | Value | Mandatory |
|---|---|---|
| access_token | Access token to be used for future request to services. | Yes |
| token_type | Token type is always bearer. | Yes |
| expires_in | Expire time for the access token after that time a new access_token must be received with the help of the refresh token. | Yes |
| state | Optional identifier if it was send during request. | No |
In case of an error the the following parameters are returned.
| Name | Value |
|---|---|
| error | error code |
| error_description | error description |
Cookie based
To verify if a user is logged in you need to read the cookie plenigo_user and sent it to the Frisbii Media API getUserProfileBySessionCookie.
403 HTTP Response- user is not logged in200 HTTP Response- user is logged in and user data is returned
Products
Check if an user has bought a product
To query if an user has bought a product, you must be logged in with Frisbii Media, once you have done this you will have a cookie that contains encrypted data of the user, once you have this. The only thing you have to do is pass the product id and the cookie header to a service method, examples are provided below.
Implementation with SDKs
Java
For Java you can use the com.plenigo.sdk.services.UserService#hasUserBought method for this purpose:
javax.servlet.http.HttpServletRequest request = null;
// Replace "MY_PRODUCT_ID" with the product id from the Frisbii Media backend
//We fill the request object with the appropriate get object and we get the Cookie header this way
String cookieHeader = request.getHeader("Cookie");
String productId = "MY_PRODUCT_ID";
boolean hasUserBought = UserService.hasUserBought(productId, cookieHeader);
PHP
For PHP you can use the \plenigo\services\UserService::hasBoughtProductWithProducts method for this purpose.
// Replace "MY_PRODUCT_ID" with the product id from the Frisbii Media backend
<?php
$hasUserBought = \plenigo\services\UserService::hasUserBought($MY_PRODUCT_ID);
“MY_PRODUCT_ID” can be an array of several IDs, then the method will return true if ANY of the provided products has been bought. This returns a boolean that will tell you if the user did buy the product(true) or not(false).This will return false too if the cookie has expired. This will return true always if the Paywall isn’t enabled, see below.
Implementation without SDKs
Another possiblity to check if the user has bought the product - can be a direct call to our REST API:
Obtain a list of bought products and subscriptions
If you wish to show a listing of bought products (limited to your company’s products and subscriptions) to the user or you want to cache the products into your system this method will come handy. The user, company and secret data will be obtained from the current logged in user, and the configured Frisbii Media SDK
Implementation with SDKs
Java
For java you can use the com.plenigo.sdk.services.UserService#getProductsBought method for this purpose.
javax.servlet.http.HttpServletRequest request = null;
//We fill the request object with the appropriate get object and we get the Cookie header this way
String cookieHeader = request.getHeader("Cookie");
ProductsBought productsBought = instance.getProductsBought(PLENIGO_USER_SAMPLE_COOKIE);
PHP
<?php
$listUserBought = \plenigo\services\UserService::getProductsBought();
This returns a com.plenigo.sdk.models.ProductsBought object with the required data.
This method will respond to the testMode configuration of the SDK If the user is not found or there is a proble with the user id, the result will be an empty object. The error codes include 400 (if company/secret has a problem) and 401 (if paramteres are incorrect). ***
Implementation without SDKs
Get product information
In order to get product information you need the product ID, you can get it in the product management area of the Frisbii Media website, let’s say for example that your product id is QFURxFv0098893021041, below there are examples of how to get the information of this product.
Implementation with SDKs
Java
To get the information related to this product you can use the com.plenigo.sdk.services.ProductService#getProductData method, which requires the product id and returns a com.plenigo.sdk.models.ProductData object:
String productId = "QFURxFv0098893021041";
ProductData productData = ProductService.getProductData(productId);
//do something with the product data object
PHP
To get the information related to this product you can use the \plenigo\services\ProductService::getProductData method, which requires the product id and returns a \plenigo\models\ProductData object.
<?php
$productId = "QFURxFv0098893021041";
$productData = ProductService::getProductData(productId);
//do something with the product data object
Implementation without SDKs
Another possibility to get product information - can be a direct call to our REST API:
Get product list
In order to list all products for a company, you can call the product listing service. It will return a paginated list of products (id, name, description) and allows to query the page you request by using the size parameter and the last ID of the previous record set (optional).
Implementation with SDKs
Java
To get the information of the products you can use the com.plenigo.sdk.services.ProductService#getProductList method, which requires the page size and an optional last id and returns a list as shown below
int pageSize = 10; // range from 10...100
PagedList<ProductInfo> productList = ProductService.getProductList(pageSize, null);
// null last ID means to query the first page
PHP
For PHP integration you can use the \plenigo\services\UserService::hasBoughtProductWithProducts method for this purpose:
<?php
$listUserBought = \plenigo\services\UserService::getProductsBought();
Implementation without SDKs
Another possibility to get product list - can be a direct call to our REST API:
Get category information
In order to get category information you need the category ID, you can get it in the category management area of the Frisbii Media website, let’s say for example that your category id is QFURxFv0098893021041, below there are examples of how to get the information of this category.
Code Examples with SDKs
Implementation without SDKs
Another possibility to get category information - can be a direct call to our REST API:
Get category list
In order to list all categories for a company, you can call the category listing service. It will return a paginated list of categories (categorytId, name) and allows to query the page you request by using the size parameter and the last ID of the previous record set (optional).
Implementation with SDKs
Java
To get the information of the categories you can use the \plenigo\services\ProductService::getCategoryList method, which requires the page size and optional last id and returns a list as shown below.
int pageSize = 10; // range from 10...100
PagedList<CategoryInfo> categoryList = ProductService.getCategoryList(pageSize, null);
// null last ID means to query the first page
PHP
To get the information of the categories you can use the \plenigo\services\ProductService::getCategoryList method, which requires the page size and page number and returns an associative array as shown below.
<?php
//range from 10...100
$pageSize = 10;// No last ID means to query the first page
$catList = ProductService::getCategoryList($pageSize);
print_r($catList) // should look like this
//Array (
//    [totalElements] => 1
//    [size] => 10
//    [lastId] => "1234"
//    [elements] => Array (
//        [0] => Array (
//            [categoryId] => "1234"
//            [title] => "General Goods"
//        )
//    )
//)
Implementation without SDKs
Another possibility to get a category list - can be a direct call to our REST API:
Is the Paywall enabled
This method allows to check if the entire paywall has been disabled from the Frisbii Media Administration Page. It allows to Quickly bring down all payments for a given Company and is useful for testing and development purposes.
Java
For JAVA you can use the com.plenigo.sdk.services.UserService#isPaywallEnabled() method for this purpose:
boolean isPayWallEnabled = UserService.isPaywallEnabled();
PHP
For PHP you can use the \plenigo\services\UserService::isPaywallEnabled() method for this purpose.
<?php
$payWallEnabled = \plenigo\services\UserService::isPaywallEnabled();
This returns a boolean that will tell you if the paywall is enabled (true) or not (false).
Implementation without SDKs
Another possibility to check if the paywall is enabled- can be a direct call to our REST API:
Checkout
It is not necessary to be logged in to use this snippet, the checkout flow is smart enough to identify when the user is not, and asks him to do so before. *** Frisbii Media’s checkout flow is done in their own site, and it can easily be started by using the Javascript SDK, there is a quick way of creating a snippet of this call in the SDK.
If you are using a programming language that is not supported by one of our SDKs and the pre generated checkout string from the Frisbii Media backend sufficient enough you must create the checkout string dynamically. Enrypt Checkout String
If you want to do a checkout with external products click the following link : Checkout with external products
Checkout with Frisbii Media managed products
If the product is managed by the Frisbii Media and was configured in the Frisbii Media website, only the product id is required for checkout.
General Workflow Checkout with Frisbii Media managed products
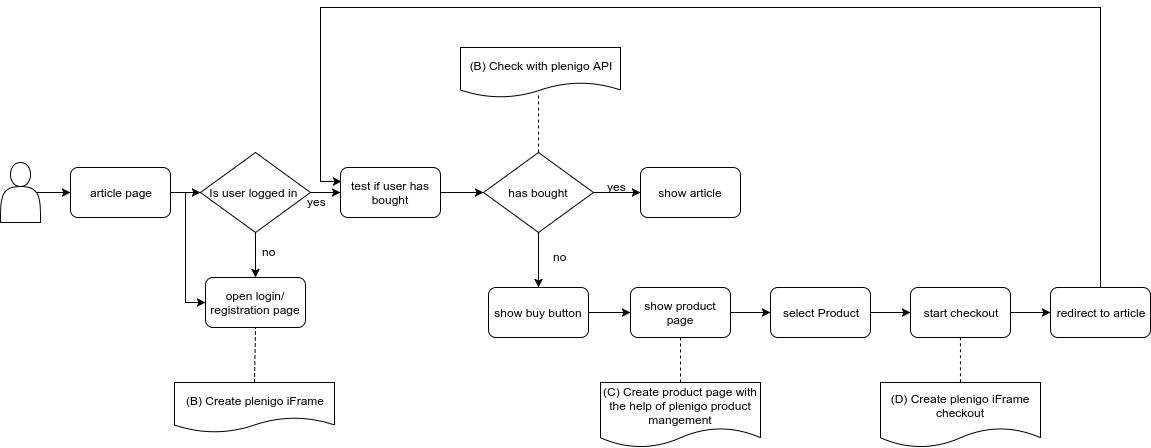
(A) Create Frisbii Media iFrame: If you want to create a registration and login page click the following link -> Create Frisbii Media iFrame
(B) Check with Frisbii Media API: If you want to check if the user has bought the product click the following link -> Has user bought
(C) optional: Create product page with the help of Frisbii Media product management: If you want to create a product page with the help of Frisbii Media click the following link -> Create product Page
(D) Create Frisbii Media iFrame checkout: If you want create a Frisbii Media iFrame checkout click the following link -> Encrpyt checkout String , Start Frisbii Media checkout
Implementation with SDKs
Java
By using the com.plenigo.sdk.builders.CheckoutSnippetBuilder class, you can create snippets easily by filling out the com.plenigo.sdk.models.Product class with the required information:
//Replace "MY_PRODUCT_ID" with the product id from the Frisbii Media backend
Product product = new Product("MY_PRODUCT_ID");
CheckoutSnippetBuilder snippetBuilder = new CheckoutSnippetBuilder(product);
//The snippet will have the following format: plenigo.checkout('ENCRYPTED_STRING_HERE');
String snippet = snippetBuilder.build();
PHP
By using the \plenigo\builders\CheckoutSnippetBuilder class, you can create snippets easily by filling out the \plenigo\models\ProductBase class with the required information.
<?php
//Replace "MY_PRODUCT_ID" with the product id from the Frisbii Media backend
$product = new \plenigo\models\ProductBase('MY_PRODUCT_ID');

// creating the checkout snippet for this product
$checkout = new \plenigo\builders\CheckoutSnippetBuilder($product);
$plenigoCheckoutCode = $checkout->build();
// now we can use this snippet in a link or button
echo '<a href="#" onclick="'.$plenigoCheckoutCode.'return false;">Buy this Product</a>';
Implementation without SDKs
Python
Node js
Checkout with external products
For these products, you have to specify more information such as tax, description, currency, etc. Below there are examples.
General Workflow external products
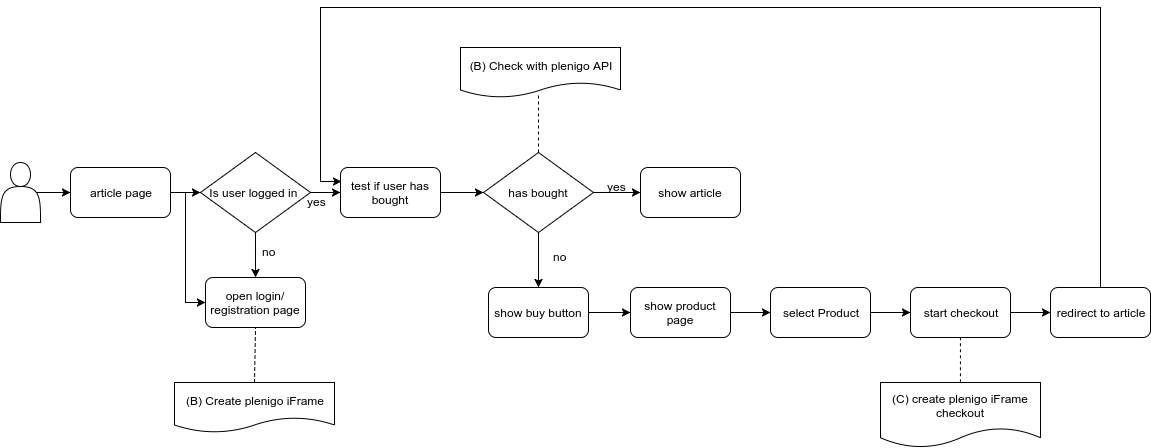
(A) Create Frisbii Media iFrame: If you want to create a registration and login page click the following link -> Create Frisbii Media iFrame
(B) Check with Frisbii Media API: If you want to check if the user has bought the product click the following link -> Has user bought
(C) Create Frisbii Media iFrame checkout: If you want create a Frisbii Media iFrame checkout click the following link -> Encrpyt checkout String , Start Frisbii Media checkout
Implementation with SDKs
Java
By using the com.plenigo.sdk.builders.CheckoutSnippetBuilder class, you can create snippets easily by filling out the com.plenigo.sdk.models.Product class with the required information:
//Replace "MY_PRODUCT_PRICE", "MY_PRODUCT_ID", MY_CURRENCY,MY_TAX_PERCENTAGE with the real data
Product product = new Product(MY_PRODUCT_PRICE,"description","MY_PRODUCT_ID","MY_CURRENCY", MY_TAX_PERCENTAGE);
CheckoutSnippetBuilder snippetBuilder = new CheckoutSnippetBuilder(product);
//The snippet will have the following format: plenigo.checkout('ENCRYPTED_STRING_HERE');
String snippet = snippetBuilder.build();
PHP
By using the \plenigo\builders\CheckoutSnippetBuilder class, you can create snippets easily by filling out the \plenigo\models\ProductBase class with the required information.
<?php
//Replace "MY_PRODUCT_ID", "MY_PRODUCT_TITLE", "MY_PRODUCT_PRICE",m"MY_PRODUCT_CURRENCY" with the real data
//creating the product ($productId, $productTitle, $price, $currency)
$product = new \plenigo\models\ProductBase('MY_PRODUCT_ID', 'MY_PRODUCT_TITLE',MY_PRODUCT_PRICE,'MY_PRODUCT_CURRENCY');
//the custom product can then be configured
//Type of the product that defines the taxes
$product->setType(ProductBase::TYPE_EBOOK);
//creating the checkout snippet for this product
$checkout = new \plenigo\builders\CheckoutSnippetBuilder($product);
$plenigoCheckoutCode = $checkout->build();
//now we can use this snippet in a link or button
echo '<a href="#" onclick="'.$plenigoCheckoutCode.'return false;">Buy this Product</a>';
Implementation without SDKs
Python
Node js
GO
Failed Payments
If you want to create a button/link to the “Failed Payments” listing for the customer you can do it by creating a special product object like this:
Implementation with SDKs
Java
//just create a checkout snippet with a no args build
CheckoutSnippetBuilder snippetBuilder = new CheckoutSnippetBuilder();
//The snippet will have the following format: plenigo.checkout('ENCRYPTED_STRING_HERE');
String snippet = snippetBuilder.build();
PHP
<?php
// creating special product object for "Failed Payments"
$product = \plenigo\models\ProductBase::buildFailedPaymentProduct();

// creating the checkout snippet
$checkout = new \plenigo\builders\CheckoutSnippetBuilder($product);
$plenigoCheckoutCode = $checkout->build();
// now we can use this snippet in a link or button
echo '<a href="#" onclick="'.$plenigoCheckoutCode.'return false;">Renew your subscription</a>';
Subscription renewal
If the product correspond to the subscription renewal, there is a flag in the Product object. This way you can create a subscription renewal button in your site easily setting this flag:
Implementation with SDKs
Java
//Replace "MY_PRODUCT_ID" with the product id from the Frisbii Media backend
Product product = new Product("MY_PRODUCT_ID");

//set the renewal flag
product.setSubscriptionRenewal(true);
CheckoutSnippetBuilder snippetBuilder = new CheckoutSnippetBuilder(product);

//The snippet will have the following format: plenigo.checkout('ENCRYPTED_STRING_HERE');
String snippet = snippetBuilder.build();
PHP
<?php
// creating a Frisbii Media-managed product
$product = new \plenigo\models\ProductBase('item-123');
// setting the subscription renewal flag
$product->setSubscriptionRenewal(true);

// creating the checkout snippet for this product
$checkout = new \plenigo\builders\CheckoutSnippetBuilder($product);
$plenigoCheckoutCode = $checkout->build();
// now we can use this snippet in a link or button
echo '<a href="#" onclick="'.$plenigoCheckoutCode.'return false;">Renew your subscription</a>';
Encrypted checkout string
The checkout functionality of the JavaScript-SDK request an encrypted and signed string as paymentData value.
This string can be received from the product management page of the Frisbii Media merchant backend or be generated on the fly. The encrypted string itself can handle
different configurations so it is suggested to generate it on the server side.
Base information:
- Decrypted data is formatted the following way {key}=>{value}&{key}=>{value}&{key}=>{value}…
- The key to use for encryption is the MD5 hash of your company secret from the Frisbii Media merchant backend.
- Encryption method to use is AES/CTR/NoPadding 128 bit. The encrypted byte string is converted to a hexadecimal string
- Initialization vector to use is 16 bit long and converted to a hexadecimal string
- Add the initialization vector hexadecimal string to the end of the encrypted data hexadecimal string (Hex.encode(encryptedData) + Hex.encode(iv))
- Create a HmacSHA256 checksum of the concatenated string and add it to the end of the string separated by a dot (.). The secret key to use is your company secret from the Frisbii Media merchant backend.
The encrypted payment data can include the following parameter. The mandatory parameters change if the Frisbii Media is managed by the Frisbii Media backend or if you create a product dynamically on the fly by every checkout. Non Frisbii Media managed products can only be one time purchases. Subscriptions must be managed over the Frisbii Media merchant backend.
-
Parameters Frisbii Media managed product
Parameter Mandatory Description pi Yes Frisbii Media product id of the product in the Frisbii Media merchant backend ts Yes flag indicating if checkout should run in test mode, must be trueorfalsepr No Price of the product (only usable for single purchases, not for subscriptions) cu No Currency identifier - ISO 4217 (only usable for single purchases, not for subscriptions) pt No Type identifier that indicates the type of the product - Important for tax rates (available values below) ti No Title to overwrite product title with ci No Frisbii Media category id of the category in the Frisbii Media merchant backend to provide additional settings to the product sso No OAuth2 redirect url if OAuth2 should be used csrf No OAuth2 csrf token rs No Flag indicating if the checkout is for a product renewal - necessary for payment methods that don’t support auto recurring e.g. SOFORT-Überweisung (only usable for subscription products) fp No Flag indicating if the checkout should be a failed payment checkout process that allows the user to close his open debts sc No Shipping costs (only usable for single purchases, not for subscriptions) om No Flag indicating if you want to use a Frisbii Media managed product but still want to overwrite the price, the title, and the product id - the Frisbii Media product only delivers the base information that are going to be overwritten dynamically pir No Product id to overwrite the Frisbii Media product id with. Only usable in combination with the om-Flagsi No Unique id of the price segment to use - the price segment passed here will be used no matter of user country or anything else pa No Flag indicating if the customers billing address should be pre filled with the name and first name saved by the personal user data -
Parameters foreign product
Parameter Mandatory Description pi Yes Your unique product id for this product ts Yes flag indicating if checkout should run in test mode, must be trueorfalsepr Yes Price of the product cu Yes Currency identifier - ISO 4217 pt Yes Type identifier that indicates the type of the product - Important for tax rates (available values below) ti Yes Product title ci No Frisbii Media category id of the category in the Frisbii Media merchant backend to provide additional settings to the product sso No OAuth2 redirect url if OAuth2 should be used csrf No OAuth2 csrf token sc No Shipping costs pa No Flag indicating if the customers billing address should be pre filled with the name and first name saved by the personal user data
Available product type identifier:
EBOOKDIGITALNEWSPAPERDOWNLOADVIDEOMUSICDIGITALPRODUCTBOOKNEWSPAPERSHIPPINGCOSTSMEMBERSHIP
Voucher Campaigns
Create loyalty campaigns by giving vouchers as giveaways
As a company if you want to give free access to customers you can generate a voucher campaign (by creating voucher Ids that can be redeemed as a free purchase of a product.
Vouchers are numbered and limited in nature (up to 10 thousand per channel) but if you are looking for an unlimited free giveaway, you can create and allow purchase of a free (as in $0-. price) product.
Campaigns
Campaigns are a set of channels with an amount of vouchers generated for each channel. Campaigns contain a name and a date range when that campaign will be active. After the expiration date or before the start date, the vouchers will not be able to be redeemed. Some examples:
- “YouTube Channel push campaign”
- “New product campaign”
- “New advertising push”
- “New branding acquisition”
Channels
Channels are a way to funnel your customers in order to measure statistics on the redemption of vouchers. You can name the channel anything you want and assign that channel to a product when creating the campaign. Some examples:
- “Facebook Group”
- “Newsletter giveaway”
- “Mobile users”
- “People at the mall in downtown New Jersey
Creating a voucher
A voucher can be used to put a “tag” on a free product purchase. Also, if you only provide the purchase though Voucher Redemption, it means that when the voucher Ids are redeemed, then there is no more purchases left for the product.
Implementation with SDKs
Java SDK coden
PHP
You can create a campaign programmatically by calling the VoucherService::generateCampaign() method with these parameters:
| Parameter | Required | Value type | Description |
|---|---|---|---|
| $name | no | string | The name you wish to give this campaign. Campaigns can have several channels (user acquisition funnels) |
| $productId | yes | string | (default: 1, max: 10000) The amount of vouchers to generate for each channel, will always be 1 for SINGLE voucher types. |
| $startDate | no | string | The start date of the campaign in the following format: YYYY-MM-DD. |
| $expirationDate | no | string | The expiration date of the campaign in the following format: YYYY-MM-DD. |
| $type | optional | string | (default: ‘SINGLE’) the voucher type, it can be ‘SINGLE’ or ‘MULTI’ |
| $amount | optional | string | (default: 1, max: 10000) The amount of vouchers to generate for each channel, will always be 1 for SINGLE voucher types. |
| $channels | optional | array(string) | Array of channel names (string[]) |
<?php
$name = "New e-book release campaign"; // The name of the campaign
$prodId = "my_product_id"; // You (free) product id
$funnels = array(
  "YouTube channel users",
  "Facebook lurkers",
  "Newsletter readers"
); // Channel names
$amount = 100; // vouchers per channel
$result = VoucherService::generateCampaign($name, $prodId, '2001-01-01', '2090-12-31', "MULTI", 100, $funnels);

// $result of type \plenigo\models\CampaignResponse
$channels = $result->getChannelVouchers();
$channelYT = $channels[0]; // "Youtube channel users" object of type \plenigo\models\ChannelVouchers
$ytVouchers = $channelYT->getIds(); // array of strings with 100 voucher ids
Implementation without SDKs
Another possibility to create a voucher - can be a direct call to our REST API:
Redeeming a voucher
Implementation with SDKs
Java SDK coden
PHP
Once you got the voucher code you can redeem it using the CheckoutService::redeemVoucher() with these parameters:
| Parameter | Required | Value type | Description | |
|---|---|---|---|---|
| $voucherCode | yes | string | The voucher code you got when creating the campaign | |
| $customerId | yes | string | The customer id you can get from the UserService::getCustomerInfo() method. |
|
| $externalUserid | no | boolean | TRUE to specify you are using [[external user management | UserManagement]] |
<?php
$customerId = "my_customer_id"; // You can obtain it from the currently logged in user or external customer management
$result = CheckoutService::redeemVoucher($ytVouchers[0], $customerId, false);

if($result){
  // Profit!
}
Implementation without SDKs
asf
´Buying´ a free product
Similarly if you want to allow the purchase of the free product previously assigned to a campaign, you can do so by using the CheckoutService::buyFreeProduct() with these parameters:
Java SDK coden
PHP
| Parameter | Required | Value type | Description | |
|---|---|---|---|---|
| $productId | yes | string | The product id of a free product | |
| $customerId | yes | string | The customer id you can get from the UserService::getCustomerInfo() method. |
|
| $externalUserid | no | boolean | TRUE to specify you are using [[external user management | UserManagement]] |
!!! IMPORTANT: as with all the methods in the SDK, errors are handled as Exceptions. This method will return TRUE if the purchase was successful
<?php
$prodId = "my_product_id"; // Your free product ID
$customerId = "my_customer_id"; // You can obtain it from the currently logged in user or external customer management
$result = CheckoutService::buyFreeProduct($prodId, $customerId, false);

if($result){
  // Profit!
}