
Checkout with Frisbii Media managed products
If the product is managed by Frisbii Media and was configured in the Frisbii Media website, only the product id is required for checkout.
If you are using a programming language that is not supported by one of our SDKs and the pre generated checkout string from the Frisbii Media backend sufficient enough you must create the checkout string dynamically. Enrypt Checkout String
Workflow Checkout with Frisbii Media managed products
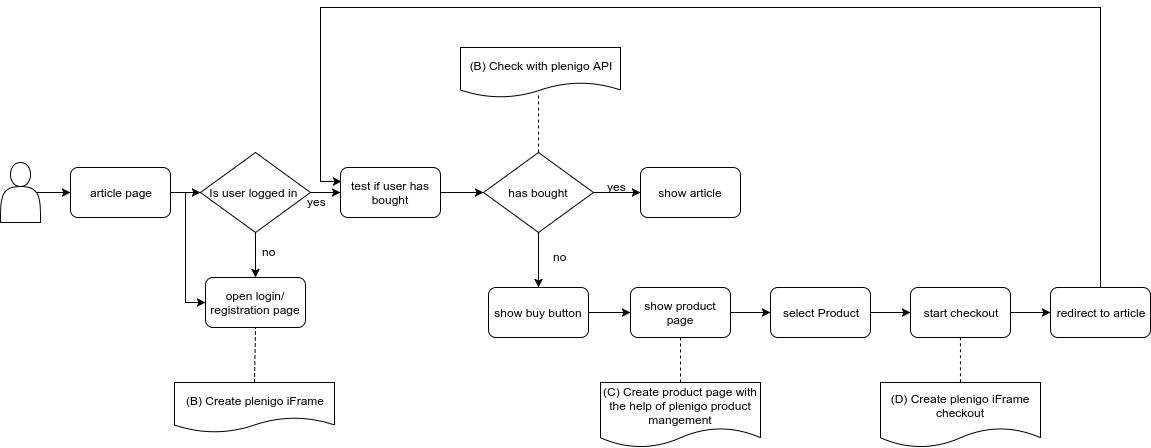
(A) Create Frisbii Media iFrame: If you want to create a registration and login page click the following link -> Create Frisbii Media iFrame
(B) Check with Frisbii Media API: If you want to check if the user has bought the product click the following link -> Has user bought
(C) optional: Create product page with the help of Frisbii Media product management: If you want to create a product page with the help of Frisbii Media click the following link -> Create product Page
(D) Create Frisbii Media iFrame checkout: If you want create a Frisbii Media iFrame checkout click the following link -> Encrpyt checkout String , Start plenigo checkout
Checkout including Frisbii Media login
If the product is managed by the Frisbii Media and was configured in the Frisbii Media website, only the product id is required for checkout.
In the Frisbii Media Backend you can create different types of products:
- Subscription
- Subscription with delivery
- Time Pass
- Single Product
It is not necessary to be logged in to use this snippet, the checkout flow is smart enough to identify when the user is not, and asks him to do so before. Frisbii Media’s checkout flow is done in their own site, and it can easily be started by using the Javascript SDK, there is a quick way of creating a snippet of this call in the SDK.
For PHP integration you can use the \plenigo\builders\CheckoutSnippetBuilder class, you can create snippets easily by filling out the \plenigo\models\ProductBase class with the required information.
| Parameter | Required | Value type | Description |
|---|---|---|---|
| $productId | yes | string | The product id from the Frisbii Media Backend |
<?php
require_once 'libs/php_sdk/plenigo/Plenigo.php';

// 1.Step: Configure the Java SDK: Provide the secret (e.g.Q11DfmzRQcQie3Pp3twzKO32HsV78TngrY2ddvj) and the company ID (e.g. 23NuCmdPoiRRkQiCqP9Q) from the Frisbii Media backend , in Test Mode (true).
$secret = 'Q11DfmzRQcQie3Pp3twzKO32HsV78TngrY2ddvj'; // The secret key of your specific company.
$companyId = '23NuCmdPoiRRkQiCqP9Q'; // The company id of your specific company.
\plenigo\PlenigoManager::configure($secret, $companyId);

// 2.Step: The product id from the Frisbii Media Backend.
$productId = 'EgLUrT56328991046641';
$product = new \plenigo\models\ProductBase($productId);

// 3.Step: Creating the checkout snippet for this product. The snippet will have the following format: plenigo.checkout('ENCRYPTED_STRING_HERE').
$checkout = new \plenigo\builders\CheckoutSnippetBuilder($product);
$plenigoCheckoutCode = $checkout -> build();
Use case
Use case for implementing checkout with Frisbii Media managed products including Frisbii Media login.
This is a complete example page where you only need to replace the company ID (e.g.23NuCmdPoiRRkQiCqP9Q ), the secret (e.g.QrrDfmzRQcQie3Pp3twzNP8LHsV78TngrY5TTvj) and the productID (aitnVIz1503443609941). This example assumes you are running in test mode.
Server logic
The first thing you have to do is configuring the PHP SDK.
<?php
require_once __DIR__ . '/plenigo/Plenigo.php';

use plenigo\builders\CheckoutSnippetBuilder;
use plenigo\models\ProductId;
use plenigo\services\UserService;

// 1.Step: Configure the Java SDK: Provide the secret (e.g.Q11DfmzRQcQie3Pp3twzKO32HsV78TngrY2ddvj) and the company ID (e.g. 23NuCmdPoiRRkQiCqP9Q) from the Frisbii Media backend , in Test Mode(true).
\plenigo\PlenigoManager::configure("Q11DfmzRQcQie3Pp3twzKO32HsV78TngrY2ddvj", "23NuCmdPoiRRkQiCqP9Q", true);

// 2.Step: The product_id from the Frisbii Media Backend.
$productId = "EgLUrT56328991046641";

// 3.Step: This method returns true if the user has already bought the product.
$hasUserBought = UserService::hasUserBought($productId);
if ($hasUserBought === FALSE) {
    $product = new ProductBase($productId);
    // Since he has not bought the product, we need to build the
    // checkout snippet so that he can do the flow on the Frisbii Media
    // site and buy.
    $snippet = (new CheckoutSnippetBuilder($prodToChkOut))->build();
}
?>
Page logic
In the Page you have to replace the company id in the Javascript declaration, e.g. if you have the following link:
<script type="application/javascript" src="https://static.plenigo.com/static_resources/javascript/COMPANY_ID/plenigo_sdk.min.js" data-lang="en"> </script>
You will replace COMPANY_ID for the corresponding id of your company (e.g. 23NuCmdPoiRRkQiCqP9Q), after replacing it should look like this:
<script type="application/javascript" src="https://static.plenigo.com/static_resources/javascript/23NuCmdPoiRRkQiCqP9Q/plenigo_sdk.min.js" data-lang="en"> </script>
By clicking on the “Buy now” button the Checkout flow will start.
Checkout flow from Frisbii Media:
-
User clicks on “Buy now” button. A login screen will appear, the user has to login in (the checkout flow is smart enough to identify when the user is not, and asks him to do so before).
-
After the login was successful a payment screen will appear. There the user has to choose a payment method for the product.
-
After the payment was successful the user will be redirect to the article page (in this example the user can read the whole article).
<!DOCTYPE html>
<html>
<head>
    <title> New York City Reimagines How It Works  </title>
     <!-- import the Frisbii Media Javascript SDK
         Let's use concrete values
         company id = e.g. "23NuCmdPoiRRkQiCqP9Q"
     -->
    <script type="application/javascript"
            src="https://static.plenigo.com/static_resources/javascript/23NuCmdPoiRRkQiCqP9Q/plenigo_sdk.min.js" data-lang="en">
    </script>
</head>
<body>
<?php if (!$hasUserBought ) { ?>
    <article>After serving a tour in the sticky rice and fruit fields of northeast Thailand for the Peace Corps,
        Leanne Spaulding landed a job at a Virginia-based trade association, working her way to a master?s degree from
        Duke University in environmental management.</p>
    </article>
    <h2> Do you want to read this article ?</h2>
    <span> Please buy a subscription</span>
    <button onclick="<?php echo $snippet ?>"> Buy now</button>
<?php } else { ?>
    <article>
        <p>After serving a tour in the sticky rice and fruit fields of northeast Thailand for the Peace Corps,
            Leanne Spaulding landed a job at a Virginia-based trade association, working her way to a master?s degree from
            Duke University in environmental management.
            Now Ms. Spaulding is in New York, where she was recently hired by the city's Sanitation Department. Her duties,
            naturally, involve garbage, but not in the traditional sense: Ms. Spaulding is trying to help sell residents of
            the nation's largest city on its ambitious composting effort. In that respect, her job is like thousands of others
            added in recent years that are slowly changing the day-to-day face of government service.
            There are now nearly 294,000 full-time city employees, more than at any point in the city?s history. The growth
            under  Mayor Bill de Blasio comes at a time of record revenues in a booming city, and has been across the board; nearly
            every city agency now employs more workers than it did in 2014, when the mayor took office.
            The hiring has allowed the de Blasio administration to restaff agencies that were cut back by Mayor Michael R.
            Bloomberg after the economic downturn of 2008. But Mr. de Blasio has gone far further, expanding the work force beyond its
            pre-recession peak, a costly investment that is not without risk: the city could be vulnerable to an economic
            downturn.</p>
    </article>
<?php } ?>
</body>
</html>
Checkout with external login
If you want to do a checkout without the login functionality of Frisbii Media you have to do the following steps. First of all you have to register the external user into the Frisbii Media system. After you have done this you have to create a Login Token for this user.
Use case
Use case for implementing checkout with Frisbii Media managed products without Frisbii Media login. The only thing you have to do is creating a product in the Frisbii Media Backend. Then you have to replace the company ID (e.g.23NuCmdPoiRRkQiCqP9Q), the secret (e.g.Q11DfmzRQcQie3Pp3twzKO32HsV78TngrY2ddvj) and the product id(e.g. aitnVIz1503443609941).This example assumes you are running in test mode.
Server logic
The first thing you have to do is configuring the PHP SDK.
<?php
require_once 'libs/php_sdk/plenigo/Plenigo.php';

// 1.Step: Configure the Java SDK: Provide the secret (e.g.Q11DfmzRQcQie3Pp3twzKO32HsV78TngrY2ddvj) and the company ID (e.g. 23NuCmdPoiRRkQiCqP9Q) from the Frisbii Media backend , in Test Mode (true).
$secret = 'Q11DfmzRQcQie3Pp3twzKO32HsV78TngrY2ddvj'; // The secret key of your specific company.
$companyId = '23NuCmdPoiRRkQiCqP9Q'; // The company id of your specific company.
\plenigo\PlenigoManager::configure($secret, $companyId, true);

// 2.Step: The product id from the Frisbii Media Backend.
$productId = 'EgLUrT56328991046641';
$customerId = '12345'; // The customer id

// 3.Step: Register the user into the Frisbii Media system.
$userId = UserManagementService::registerUser("user@testmail.com", "language", "theCustomerId", 'firstName', 'name');

// 4.Step: Create the login token for this user.
$loginToken = UserManagementService::createLoginToken($userId);

// 5.Step: Set the product id.
$product = new ProductBase($productId);

// For example CRSF Token....
$settings = array();

// 6.Step: Create the login token.
$checkout = new \plenigo\builders\CheckoutSnippetBuilder($product);
$plenigoCheckoutCode = $checkout->build($settings, $loginToken);

// 7.Step: Creating the checkout snippet for this product. The snippet will have the following format: plenigo.checkoutWithRemoteLogin('ENCRYPTED_STRING_HERE').
$plenigoCheckoutCode = $checkout -> build();
Page logic
In the Page you have to replace the company id in the Javascript declaration, e.g. if you have the following link:
<script type="application/javascript" src="https://static.s-devops.com/static_resources/javascript/COMPANY_ID/plenigo_sdk.min.js" data-lang="en"> </script>
You will replace COMPANY_ID for the corresponding id of your company(e.g. 23NuCmdPoiRRkQiCqP9Q), after replacing it should look like this:
<script type="application/javascript" src="https://static.s-devops.com/static_resources/javascript/23NuCmdPoiRRkQiCqP9Q/plenigo_sdk.min.js" data-lang="en"> </script>
By clicking on the “Buy now” button the Checkout flow will start.
Checkout flow from Frisbii Media:
-
User clicks on “Buy now” button. A login screen will appear, the user has to login in (the checkout flow is smart enough to identify when the user is not, and asks him to do so before). Checkout With Remote Login)
-
After the login was successful a payment screen will appear. There the user has to choose a payment method for the product.
-
After the payment was successful the user will be redirect to the article page.
<html>
<head>
    <title> The title of the aritcle </title>
    <!-- import the Frisbii Media Javascript SDK
     Let's use concrete values:
     company id = e.g. "23NuCmdPoiRRkQiCqP9Q"
     -->
    <script type="application/javascript"
            src="https://static.s-devops.com/static_resources/javascript/23NuCmdPoiRRkQiCqP9Q/plenigo_sdk.min.js"
            data-lang="en">
    </script>
</head>
<body>
<button onclick="<?php echo $plenigoCheckoutCode ?>"> Buy now</button>
</body>
</html>
Working with Rules
Frisbii Media offers ability to add rules to each product. One have to add those rules within Frisbii Media Backend. Rules append logic to each purchase. So one can sell a cheaper product only, if the customer is younger than 20 years - if the customer is older he will buy the normal priced product automatically. If a 19 years old customer buys this product, he will be switched to the normal priced product at his 20th birthday.
Rule Logic
To validate a rule, Frisbii Media normally shows additional screens in the checkout.
Rule via API
Otherwise you can validate a rule before starting a checkout. You have to decide, which product should be shown to the user. Frisbii Media will switch the products automatically at the customer’s birthday. You only have to add the birthday rule via API:
<?php
require_once 'libs/php_sdk/plenigo/Plenigo.php';

// 1.Step: Configure the Java SDK: Provide the secret (e.g.Q11DfmzRQcQie3Pp3twzKO32HsV78TngrY2ddvj) and the company ID (e.g. 23NuCmdPoiRRkQiCqP9Q) from the Frisbii Media backend , in Test Mode (true).
$secret = 'Q11DfmzRQcQie3Pp3twzKO32HsV78TngrY2ddvj'; // The secret key of your specific company.
$companyId = '23NuCmdPoiRRkQiCqP9Q'; // The company id of your specific company.
\plenigo\PlenigoManager::configure($secret, $companyId, true);

// 2.Step: The product id from the Frisbii Media Backend.
$productId = 'EgLUrT56328991046641';
$customerId = '12345'; // The customer id

// 3.Step: Register the user into the Frisbii Media system.
$userId = UserManagementService::registerUser("user@testmail.com", "language", "theCustomerId", 'firstName', 'name');

// 4.Step: Create the login token for this user.
$loginToken = UserManagementService::createLoginToken($userId);

// 5.Step: Set the product id.
$product = new ProductBase($productId);

// 6.Step: add a birthday to validate the rule
$checkout = new \plenigo\builders\CheckoutSnippetBuilder($product);
$checkout->addBirthdayRule(new DateTime("10.09.1976"));

// For example CRSF Token....
$settings = array();

// 7.Step: Create the login token.
$plenigoCheckoutCode = $checkout->build($settings, $loginToken);

// 8.Step: Creating the checkout snippet for this product. The snippet will have the following format: plenigo.checkoutWithRemoteLogin('ENCRYPTED_STRING_HERE').
$plenigoCheckoutCode = $checkout -> build();
Working with skeleton products
Sometimes you have a huge amount of similar products. In this case you can create one product in the Frisbii Media Backend to manage them all. We call it “skeleton”.
You can overwrite the product title, which will be shown during checkout and in invoices, price and the product id.
Example of skeletons
Lets say we have a wordpress blog. We want to sell each post as single products. Users should have access only to post they’ve bought, all other posts should remain locked. Since we have a huge amount of posts we don’t want create corresponding Frisbii Media products in the Frisbii Media Backend.
require_once 'libs/php_sdk/plenigo/Plenigo.php';

// 1.Step: Configure the PHP SDK: Provide the secret (e.g.Q11DfmzRQcQie3Pp3twzKO32HsV78TngrY2ddvj) and the company ID (e.g. 23NuCmdPoiRRkQiCqP9Q) from the Frisbii Media backend , in Test Mode (true).
$secret = 'Q11DfmzRQcQie3Pp3twzKO32HsV78TngrY2ddvj'; // The secret key of your specific company.
$companyId = '23NuCmdPoiRRkQiCqP9Q'; // The company id of your specific company.
\plenigo\PlenigoManager::configure($secret, $companyId, true);

// 2.Step: The product id from the Frisbii Media Backend. (our skeleton)
$productId = 'EgLUrT56328991046641';
$customerId = '12345'; // The customer id

// 3.Step: Register the user into the Frisbii Media system.
$userId = UserManagementService::registerUser("user@testmail.com", "language", "theCustomerId", 'firstName', 'name');

// 4.Step: Create the login token for this user.
$loginToken = UserManagementService::createLoginToken($userId);

// 5.Step: Set the product id.
$price = '12.99'; // our customized price
$product = new ProductBase($productId, 'Title which should be shown during checkout', $price);
$product->setProductIdReplacement('123456'); // ID of our blog-post

// 6.Step: Create the Checkout object
$checkout = new \plenigo\builders\CheckoutSnippetBuilder($product);

// 7.Step: Creating the checkout snippet for this product.
$plenigoCheckoutCode = $checkout -> build(['overrideMode' => true], $loginToken);
Checkout without SDK
If you are using a programming language that is not supported by one of our SDKs and the pre generated checkout string from the Frisbii Media Backend sufficient enough you must create the checkout string dynamically. Enrypt Checkout String
Failed Payments
If a payment gets failed form a customer you can create a button/link to the “Failed Payments” listing for the customer you can do it by creating a special product object like this.
For PHP integration you can use the \plenigo\builders\CheckoutSnippetBuilder class, you can create snippets easily by filling out the \plenigo\models\ProductBase class with the required information.
<?php
require_once 'libs/php_sdk/plenigo/Plenigo.php';

// 1.Step: Configure the PHP SDK: The secret (e.g. secret:Q11DfmzRQcQie3Pp3twzKO32HsV78TngrY2ddvj) and the company ID (e.g.:23NuCmdPoiRRkQiCqP9Q).
$secret = 'Q11DfmzRQcQie3Pp3twzKO32HsV78TngrY2ddvj'; // The secret key of your specific company.
$companyId = '23NuCmdPoiRRkQiCqP9Q'; // The company ID of your specific company.
\plenigo\PlenigoManager::configure($secret, $companyId);

// 2.Step: Creating special product object for "Failed Payments".
$product = ProductBase::buildFailedPaymentProduct();

// 3.Step: Creating the checkout snippet for this product.The snippet will have the following format: plenigo.checkout('ENCRYPTED_STRING_HERE').
$checkout = new \plenigo\builders\CheckoutSnippetBuilder($product);
$plenigoCheckoutCode = $checkout->build();

// 4.Step: Now we can use this snippet in a link or button.
echo '<a href="#" onclick="'.$plenigoCheckoutCode.'return false;">Buy now </a>';
Use case
Use case for implementing failed payments. The only thing you have to do is creating a product in the Frisbii Media Backend. Then you have to replace the company id(e.g.23NuCmdPoiRRkQiCqP9Q) and the secret (e.g.Q11DfmzRQcQie3Pp3twzKO32HsV78TngrY2ddvj).This example assumes you are running in test mode.
Server logic
The first thing you have to do is configuring the PHP SDK.
<?php
require_once __DIR__ . '/plenigo/Plenigo.php';

use plenigo\builders\CheckoutSnippetBuilder;
use plenigo\models\ProductBase;

// 1.Step: Configure the Java SDK: Provide the secret (e.g.Q11DfmzRQcQie3Pp3twzKO32HsV78TngrY2ddvj) and the company ID (e.g. 23NuCmdPoiRRkQiCqP9Q) from the Frisbii Media backend , in Test Mode (true).
\plenigo\PlenigoManager::configure("Q11DfmzRQcQie3Pp3twzKO32HsV78TngrY2ddvj", "23NuCmdPoiRRkQiCqP9Q"), true;

// 2.Step: Creating special product object for "Failed Payments".
$product = ProductBase::buildFailedPaymentProduct();

// 3.Step: Creating the checkout snippet for this product.The snippet will have the following format: plenigo.checkout('ENCRYPTED_STRING_HERE').
$checkout = new CheckoutSnippetBuilder($product);
$plenigoCheckoutCode = $checkout->build();
?>
Page logic
In the Page you have to replace the company id in the Javascript declaration, e.g. if you have the following link:
<script type="application/javascript" src="https://static.plenigo.com/static_resources/javascript/COMPANY_ID/plenigo_sdk.min.js" data-lang="en"> </script>
You will replace COMPANY_ID for the corresponding id of your company(e.g. 23NuCmdPoiRRkQiCqP9Q), after replacing it should look like this:
<script type="application/javascript" src="https://static.plenigo.com/static_resources/javascript/23NuCmdPoiRRkQiCqP9Q/plenigo_sdk.min.js" data-lang="en"> </script>
By clicking on the “Buy now” button the Checkout flow will start.
<!DOCTYPE html>
<html>
<head>
    <title> The title of the article  </title>
    <!--
        Let's use concrete values:
        company id = e.g. "23NuCmdPoiRRkQiCqP9Q"
    -->
    <script type="application/javascript"
            src="https://static.plenigo.com/static_resources/javascript/23NuCmdPoiRRkQiCqP9Q/plenigo_sdk.min.js" data-lang="en">
    </script>
</head>
<body>
<a href="#" onclick="<?php echo $plenigoCheckoutCode ?> return false;">Buy now </a>';
</body>
</html>
Subscription renewal
If the product correspond to the subscription renewal, there is a flag in the Product object. This way you can create a subscription renewal button in your site easily setting this flag.
| Parameter | Required | Value type | Description |
|---|---|---|---|
| $productId | yes | string | The product id from the Frisbii Media Backend |
<?php
require_once 'libs/php_sdk/plenigo/Plenigo.php';
use plenigo\builders\CheckoutSnippetBuilder;
use plenigo\models\ProductBase;

// 1.Step: Configure the Java SDK: Provide the secret (e.g.Q11DfmzRQcQie3Pp3twzKO32HsV78TngrY2ddvj) and the company ID (e.g. 23NuCmdPoiRRkQiCqP9Q) from the Frisbii Media backend.
$secret = 'Q11DfmzRQcQie3Pp3twzKO32HsV78TngrY2ddvj'; // The secret key of your specific company.
$companyId = '23NuCmdPoiRRkQiCqP9Q'; // The company ID of your specific company.
\plenigo\PlenigoManager::configure($secret, $companyId);

// 2.Step: Set the product id.
$productId = 'EgLUrT56328991046641';
$product = new ProductBase($productId);

// 3.Step: Set the subscription renewal flag.
$product->setSubscriptionRenewal(true);

// 4.Step: Creating the checkout snippet for this product. The snippet will have the following format: plenigo.checkout('ENCRYPTED_STRING_HERE').
$checkout = new CheckoutSnippetBuilder($product);
$plenigoCheckoutCode = $checkout->build();

// 5.Step: Now we can use this snippet in a link or button.
echo '<a href="#" onclick="'.$plenigoCheckoutCode.'return false;">Renew your subscription</a>';
Use case
Use case for implementing checkout with Frisbii Media managed products without Frisbii Media login. The only thing you have to do is creating a product in the Frisbii Media Backend. Then you have to replace the company id(e.g.23NuCmdPoiRRkQiCqP9Q), the secret (e.g.Q11DfmzRQcQie3Pp3twzKO32HsV78TngrY2ddvj) and the product id(e.g. aitnVIz1503443609941).This example assumes you are running in test mode.
Server logic
The first thing you have to do is configuring the PHP SDK.
<?php
require_once __DIR__ . '/plenigo/Plenigo.php';

use plenigo\builders\CheckoutSnippetBuilder;
use plenigo\models\ProductBase;

// 1.Step: Configure the Java SDK: Provide the secret (e.g.Q11DfmzRQcQie3Pp3twzKO32HsV78TngrY2ddvj) and the company ID (e.g. 23NuCmdPoiRRkQiCqP9Q) from the Frisbii Media backend , in Test Mode (true).
\plenigo\PlenigoManager::configure("Q11DfmzRQcQie3Pp3twzKO32HsV78TngrY2ddvj", "23NuCmdPoiRRkQiCqP9Q", true);

// 2.Step: The_product_ID from the Frisbii Media Backend.
$productId = 'aitnVIz1503443609941';
$product = new ProductBase($productId);

// 3.Step: Set the subscription renewal flag.
$product->setSubscriptionRenewal(true);

// 4.Step_ Creating the checkout snippet for this product.
$checkout = new CheckoutSnippetBuilder($product);
$plenigoCheckoutCode = $checkout->build();
?>
Page logic
In the Page you have to replace the company id in the Javascript declaration, e.g. if you have the following link:
<script type="application/javascript" src="https://static.plenigo.com/static_resources/javascript/COMPANY_ID/plenigo_sdk.min.js" data-lang="en"> </script>
You will replace COMPANY_ID for the corresponding id of your company(e.g. 23NuCmdPoiRRkQiCqP9Q), after replacing it should look like this:
<script type="application/javascript" src="https://static.plenigo.com/static_resources/javascript/23NuCmdPoiRRkQiCqP9Q/plenigo_sdk.min.js" data-lang="en"> </script>
<html>
<head>
    <title> The title of the article </title>
    <!--
        Let's use concrete values
        company ID = e.g. "23NuCmdPoiRRkQiCqP9Q"
    -->
    <script type="application/javascript"
            src="https://static.plenigo.com/static_resources/javascript/23NuCmdPoiRRkQiCqP9Q/plenigo_sdk.min.js" data-lang="en">
    </script>
</head>
<body>
<a href="#" onclick="<?php echo $plenigoCheckoutCode ?> return false;">Renew your subscription</a>';
</body>
</html>