
External user management
It is possible to use your own registration and login process and only login users into Frisbii Media via so called “Login Token”. Therefore you have to register the user into the Frisbii Media system. After that you have to create a Login Token to indicate a successful login.
- Register an external user ?
- Create a login token for an external user ?
- Change email address of an existing user ?
- Giving a customer more access IDs ?
- Add external user ID ?
General Workflow external user management
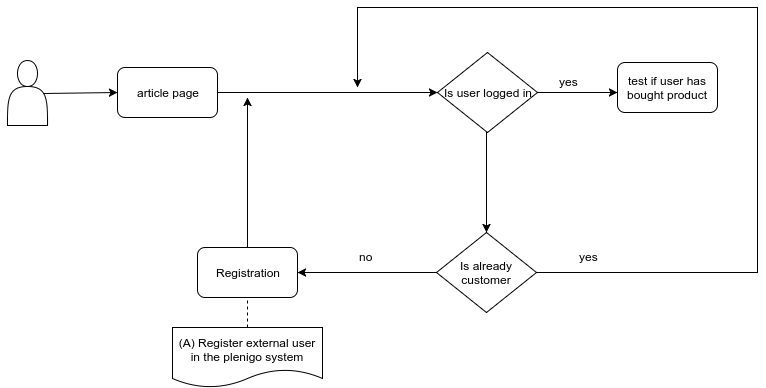
(A) Register external user in the Frisbii Media system: -> Register External User
Register an external user
First of all you have to register the user in the Frisbii Media system.
PHP
For PHP integration you can use the plenigo\services\UserManagementService::registerUser in order to register an external user.
| Parameter | Required | Value type | Description |
|---|---|---|---|
| yes | string | The email of the user to register | |
| $language | yes | string | The language |
| $externalUserID | yes | int | The external user ID for the new customer |
| $firstName | yes | string | The given name for the new customer |
| $name | yes | string | The name of the new customer |
<?php
require_once 'libs/php_sdk/plenigo/Plenigo.php';

// 1.Step: Configure the PHP SDK: Provide the secret(e.g.Q11DfmzRQcQie3Pp3twzKO32HsV78TngrY2ddvj) and the company ID(e.g. 23NuCmdPoiRRkQiCqP9Q) from the Frisbii Media backend.
$secret = 'QrrDfmzRQcQie3Pp3twzNP8LHsV78TngrY5TTvj'; // The company ID of your specific company.
$companyId = '12NuCmdZUTRRkQiCqP2Q'; // The secret key of your specific company.
\plenigo\PlenigoManager::configure($secret, $companyId);

//2.Step: Fill the data for the registerUser() method.
$email = "testAddNewUser@mail.com"; // The email address of the customer.
$language = "en"; // The language.
$externalUserId = "A1BKAFZZ3H0H"; // The external customer ID e.g "A1BKAFZZ3H0H" that the customer should have.
$firstName = "new"; // The first name of the customer.
$name = "user"; // The name of the customer.
$withPasswordReset = false; // (Parameter: True) The customer will get a one time password. With this password he can login in the application.
$failByExistingEmail = false; // (Parameter:False)If the customer already registered it will not recreate a the customer it will return the existing Frisbii Media customer id.
// (Parameter: True): If the customer is already registered it will return the http status 409.
$registerUser = \plenigo\services\UserManagementService::registerUser($email, $language , $externalUserId, $firstName , $name, $withPasswordReset, $failByExistingEmail);
Implementation without SDK
Another possibility to register an external user into the Frisbii Media system - is a direct call to our REST API:
Create Login Token
To indicate a successful login to the Frisbii Media system you need to create a so called “Login Token”. This login token is valid for 5 minutes and can be passed e.g. to the build()-method of the \plenigo\builders\CheckoutSnippetBuilder.
PHP
For PHP integration you can use the plenigo\services\UserManagementService::createLoginToken in order to create a Login Token.
| Parameter | Required | Value type | Description |
|---|---|---|---|
| customerId | yes | string | The customer ID |
| useExternalCustomerId | yes | boolean | The external customer ID |
<?php
require_once 'libs/php_sdk/plenigo/Plenigo.php';

// 1.Step: Configure the PHP SDK: Provide the secret(e.g.Q11DfmzRQcQie3Pp3twzKO32HsV78TngrY2ddvj) and the company ID(e.g. 23NuCmdPoiRRkQiCqP9Q) from the Frisbii Media backend.
$secret = 'QrrDfmzRQcQie3Pp3twzNP8LHsV78TngrY5TTvj'; // The secret key of your specific company.
$companyId = '12NuCmdZUTRRkQiCqP2Q'; // The company ID of your specific company.
\plenigo\PlenigoManager::configure($secret, $companyId);

// 2.Step : Fill the data for the createLoginToken() method.
$customerId = '56202510'; // The customer ID.
$useExternalCustomerId = false;

// 3.Step: This method returns a login token for the customer.
$loginToken = \plenigo\services\UserManagementService::createLoginToken($customerId, $useExternalCustomerId);
Use case PHP
Use case for registering and creating a login token for a checkout.
Server logic
Prerequisites
- Configure the PHP SDK.
<?php
require_once __DIR__ . '/plenigo/Plenigo.php';

use plenigo\models\ProductBase;
use plenigo\services\UserManagementService;
use plenigo\builders\CheckoutSnippetBuilder;

// 1.Step: Configure the PHP SDK: Provide the secret(e.g.Q11DfmzRQcQie3Pp3twzKO32HsV78TngrY2ddvj) and the company ID(e.g. 23NuCmdPoiRRkQiCqP9Q) from the Frisbii Media backend.
\plenigo\PlenigoManager::configure("Q11DfmzRQcQie3Pp3twzKO32HsV78TngrY2ddvj", "23NuCmdPoiRRkQiCqP9Q");

// 2.Step: The product ID.
$product = new ProductBase('EgLUrT56328991046641');

// 3.Step: Creating a checkout.
$checkout = new CheckoutSnippetBuilder($product);

// 4.Step: Fill the data for the registerUser() method.
$email = "test@mail.com"; // The email address.
$language = "en"; // The language.
$externalUserID = "12345"; // The external user ID.
$firstName = "new"; // The first name.
$name = "customer"; // The name.
$withPasswordReset = false; // (Parameter: True) The customer will get a one time password. With this password he can login in the application.
$failByExistingEmail = false; // (Parameter:False)If the customer already registered it will not recreate a the customer it will return the  existing Frisbii Media customer id.
// (Parameter: True): If the customer is already registered it will return the http status 409.
$registerUser = \plenigo\services\UserManagementService::registerUser($email, $language , $externalUserId, $firstName , $name, $withPasswordReset, $failByExistingEmail);
$userId = UserManagementService::registerUser($email, $language, $externalUserID, $firstName, $name);

// 5.Step: Add login token to this user.
$loginToken = UserManagementService::createLoginToken($userId);

// Setttings e.g. using CSRF Token
$settings = array();

// 6.Step: Add the login token to the checkout snippet builder.
$plenigoCheckoutCode = $checkout->build($settings, $loginToken);
?>
Page logic
In the Page logic you have to replace the company ID (e.g. 23NuCmdPoiRRkQiCqP9Q). By clicking on the “Special offer for you” Button the Checkout flow will start. The user has to choose a payment method to the product. After a successful payment the user will be redirected to the article page.
<html>
<head>
    <title> Title of the product </title>
    <!-- import the Frisbii Media Javascript SDK -->
    <script type="application/javascript"
            src="https://static.s-devops.com/static_resources/javascript/23NuCmdPoiRRkQiCqP9Q/plenigo_sdk.min.js"
            data-lang="en">
    </script>
</head>
<body>
<button onclick="<?php echo $plenigoCheckoutCode ?>"> Special offer for you</button>
</body>
</html>
Implementation without SDK
Another possibility to create login token - is a direct call to our REST API:
Change email address of an existing user
It is very important for the Frisbii Media system to know the correct email address of the user. Otherwise invoices, etc. cannot sent to the user. If the user or one of your support agents changes the email of the user in your user management system you have to inform the Frisbii Media system about the changes.
PHP
For PHP integration you can use the plenigo\services\UserManagementService::changeEmail in order to change an e-mail address of an existing user.
| Parameter | Required | Value type | Description |
|---|---|---|---|
| $customerId | yes | string | The customer ID |
| yes | string | The new email address for that customer | |
| $useExternalCustomerId | yes | boolean | The external customer ID |
<?php
require_once 'libs/php_sdk/plenigo/Plenigo.php';

// 1.Step: Configure the PHP SDK: Provide the secret(e.g.Q11DfmzRQcQie3Pp3twzKO32HsV78TngrY2ddvj) and the company ID(e.g. 23NuCmdPoiRRkQiCqP9Q) from the Frisbii Media backend.
$secret = 'Q11DfmzRQcQie3Pp3twzKO32HsV78TngrY2ddvj'; // The secret key of your specific company.
$companyId = '23NuCmdPoiRRkQiCqP9Q'; // The company ID of your specific company.
\plenigo\PlenigoManager::configure($secret, $companyID);

// 2.Step: Fill the data for the changeEmail() method.
$customerId = "A1BKAFZZ3H0H"; // The customer ID.
$email = "testChangeEMail@mail.com"; // The new email address.
$useExternalCustomerId = false; // The use external customer ID.

// 3.Step: $changeEmail will be TRUE if the email address was changed successfully
$changeEmail = \plenigo\services\UserManagementService::changeEmail($customerId, $email, $useExternalCustomerID);
Implementation without SDK
Another possibility to change an email address of an existing user - is a direct call to our REST API:
Giving a customer more access IDs
With this functionality the company can provide several access IDs to a given customer. This is useful if the company has internal systems for billing, CRM, customer engagement, etc. With this data entered, you can use any of these IDs to check for access to products below.
PHP
For PHP integration you can use the plenigo\services\UserManagementService::importCustomerAccess in order to give customer more access IDs.
| Parameter | Required | Value type | Description |
|---|---|---|---|
| $customerID | yes | string | The customer IDs |
| $useExternalCustomerID | yes | boolean | The external customer ID |
| $customerIDs | yes | String | Array of one of four customer access IDs |
<?php
require_once 'libs/php_sdk/plenigo/Plenigo.php';
// 1.Step: Configure the PHP SDK: The secret (e.g. secret:Q11DfmzRQcQie3Pp3twzKO32HsV78TngrY2ddvj) and the company ID (e.g.:23NuCmdPoiRRkQiCqP9Q).
$secret = 'Q11DfmzRQcQie3Pp3twzKO32HsV78TngrY2ddvj'; // The secret key of your specific company.
$companyId = '23NuCmdPoiRRkQiCqP9Q'; // The company ID of your specific company.
\plenigo\PlenigoManager::configure($secret, $companyId);

// 2.Step: Fill the data for the importCustomerAccess() method.
$customerId = 'A1BKAFZZ3H0H';// The customer id
$isExternal = 'false';
$customerIds = '12345'; // The customer ids.

// 3.Step: This method returns true if the customer access added successfully otherwise it will return false.
$importCustomerAccess = UserManagementService::importCustomerAccess($customerId, $isExternal, $customerIds);
Add external user id
Add an external user id to a user that doesn’t have an external user id assigned yet.
PHP
For PHP integration you can use the plenigo\services\UserManagementService::addExternalCustomerID method for this purpose:
| Parameter | Required | Value type | Description |
|---|---|---|---|
| $customerId | yes | string | The customer ID |
| $externalCustomerId | yes | String | The external user ID for the customer you want to add to the customer |
<?php
require_once 'libs/php_sdk/plenigo/Plenigo.php';

// 1.Step: Configure the PHP SDK: Provide the secret(e.g.Q11DfmzRQcQie3Pp3twzKO32HsV78TngrY2ddvj) and the company ID(e.g. 23NuCmdPoiRRkQiCqP9Q) from the Frisbii Media backend.
$secret = 'Q11DfmzRQcQie3Pp3twzKO32HsV78TngrY2ddvj'; // The secret key of your specific company.
$companyId = '23NuCmdPoiRRkQiCqP9Q'; // The company ID of your specific company.
\plenigo\PlenigoManager::configure($secret, $companyId);

// 2.Step: Fill the data for the addExternalCustomerId() method.
$customerId = '56202510'; // The customer ID from the Frisbii Media Backend.
$externalCustomerId = '12345'; // The external user ID you want to add to the customer and which is not existing in the Frisbii Media Backend yet.

// 3.Step: This method return true if the user is added successfully otherwise it will return false.
$addExternalCustomerId = UserManagementService::addExternalCustomerId($customerId, $externalCustomerId);
Implementation with SDKs
Another possibility to add external user id - is a direct call to our REST API: